In the past, link building management meant keeping a list of all of the directories you had submitted to and probably another one detailing your blog comments.
But link building doesn’t work like that any more. In 2013 we are going to see an even bigger move towards ultra-high-quality link-building. In other words, everything you do should be geared towards getting the best links possible. Even if you only get 1 or 2 links per month.
For a small site, without a big reputation to fall back on, getting top quality links is a very involved process and there are few shortcuts – but a good management system will go a long way to help. Here at ThinkTraffic we have a system designed to make our work as efficient as possible, whilst not compromising on the quality of the links produced.
Here’s how you can do it too:
Finding Link Opportunities
Every good link building campaign starts with a target list and ours is no different. We will be using several techniques to find potential link targets, we will then filter our prospects and put them into a spreadsheet.
Google / Bing
The easiest way to find blogs of course is Google and Bing. You can start by using a few fairly specific searches, including some search operators to get the most relevant prospects. Let’s say you are building links for a baby/parenting website; here are some searches you might try:
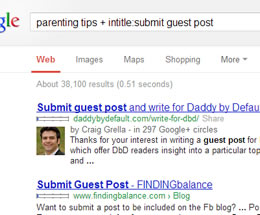
- parenting tips + intitle:guest post
- parenting tips + “write for us”
- parenting + inurl:blog intitle:submit guest post
You will have to experiment to see which searches bring you the best results. The blogs you find this way will typically be the easiest targets because they will be blogs that are actually asking their readers for guest posts. But we want the very best blogs, so you might also try searches such as:
- parenting advice + inurl:blog
- parenting tips + inurl:blog
- parenting blog
- parenting tips blog
These searches may need filtering more and you will get some results which aren’t really relevant, but they will also give you a much larger selection of blogs to choose from, and probably some higher level blogs than the first set of searches.
Open Site Explorer
Open Site Explorer by SEOMoz is a key tool for all sorts of SEO related stuff. In particular though, we are going to use it to check out our competition. Start by finding a handful of sites which rank well for terms you would like to rank for. Pick one high-ranking blog and one high-ranking website or e-commerce store.

Go to Open Site Explorer and put in each URL in turn. What we are interested in is the linking domains, since this will list all of the domains linking to each site.
Log-in (or register) and download your results as a CSV file. You can then head over to linkdetective.com, upload your lists of links and get a detailed breakdown by link type. What we are interested in are blog type sites, so filter out any irrelevant links. What you are then left with is a list of all the blogs that are linking to your competitors… Cool huh?
Twitter / Followerwonk
Our final source of prospects will be Twitter. But rather than going straight to Twitter, let’s look at Followerwonk. You can sign up to Follwerwonk for free, but you will get more features if you are a premium SEOMoz member.

Followerwonk gives you loads of ways to search for users based on what they are into, and more importantly it assigns each user an influence rating. Once you get acquainted with the software you should fairly quickly be able to come up with a list of influential Twitter users and from there you can find their personal blogs too (not all of them will have one, but most will).
Filtering & Storing Your Prospects
Once you have all of your lists, put them into one Excel spreadsheet, filter out any duplicates (Data -> Remove Duplicates) and then go through your list and manually check for quality. The result should be a pretty comprehensive list of the top blogs in your niche. If you can get a link from just a handful of these you will be doing well in no-time.
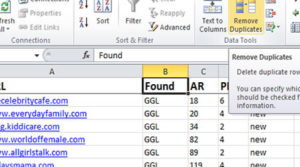
Now it’s time to put your spreadsheet together. You already have the prospects’ URLs in column A, so add a header row at the top and add the titles: Blog URL, Found, Alexa Rank, Page Rank, Status, Notes, On Date, Title
Right now all you need to do is fill in the ‘found’, ‘Alexa’ and ‘PR’ columns. For ‘found’, put where you found the blog, eg; Google, OSE or Twitter. And under ‘status’ put ‘New’. Finally, move this worksheet to the middle (we’ll use the first & third worksheets later) and rename it ‘yourdomain.com’.
Link Building Work Flow
Now that you have your list of prospects you can start working on getting some links. There are 4 phases to gaining links, although you won’t always have to go through all of them.
Warm-Up
Getting links from top-notch blogs will take some ground work. You can’t necessarily just email them and get a gig, and even if you do, you will do much better if you build a relationship first.
This stage is not about getting a guest post, it’s about making a connection. Start by commenting on their blog, follow them on Twitter and maybe send a message if they ask something that you can help with. Just pick a handful of high-profile bloggers to work on for now.
Change their statuses to ‘Warmup’ and in the date column put the date that you started trying to connect. In the notes column you can put anything that might be helpful, such as how many comments you have left or any interaction you get.
Contacting Bloggers
Unless a blogger actually asks for guest posts, you will need to contact them before you send one. It is up to you whether you email out of the blue or try taking the step above first (warm-up). If you make a connection first your chances of success are much higher.
Get in touch via email or Twitter, whatever makes most sense; be polite and be real, don’t send a template-email. There are numerous examples of how to do this on-line, just find an approach that works for you. It’s often a good idea to suggest a topic or two… Hopefully, if you have already made a connection, you will have a great idea for a post that your prospect will love.
Change the status to ‘Contacted’ and change the date to whatever date you contact them on. You can use the ‘notes’ column to record how you contacted them (eg, email or twitter). If you get no response after a week or so, contact them again and make a note of having done so in the notes column.
Submitting A Post
This is the part where you actually send a guest post. I assume you know that your guest post needs to be really good. No top quality blog is going to accept second rate content, so if you can’t do this bit, the whole plan falls down. If you need help with your content writing, read this post by Neil Patel on the subject.
Some blogs, you can submit a post to right away; others, you will have to follow one or both of the steps above first. Either way, submitting a post should be pretty simple.
When you send a guest post submission, change the status to ‘Submitted’, change the date column to the current date and in the title column put the title of the post you sent. You can also use notes to record how you sent the post (eg, email, wordpress interface or contact form).
If there is no response after a week or so, chase it up by re-sending the post and asking whether they got it/ read it/ liked it… Again, make a note of any follow-ups.
Getting The Post Published
Hopefully, by using your spreadsheet you should be able to manage this process for several blogs at once. You can start warming-up new prospects whilst you wait for a response from ones you have contacted or submitted a post to. There are just a few more statuses that you may need to use:
Scheduled
When a blogger confirms that your post will go live. Use the notes column to record the publishing date if you are given one. Use the date column to record the date on which you are told the post will be published.
Live
Once a post goes live, change the status to ‘Live’. You can now remove the title and date… You will be adding details of the post to another worksheet shortly.
Rejected / Noresponse
Fairly self-explanatory. If you get no response after several attempts, or if you get a response saying that the blogger does not accept guest posts, use one of these statuses – no need to record the date or anything.
Recording Your Links
We don’t store link info in this worksheet because we want to keep the clutter down for maximum efficiency. The links will be recorded in the third worksheet, which we will name ‘links’. You should create a header row with the following headings: month, keywords, post url, link to.
When you get a new link go live, put in the month of publishing (I like to use the format “2013January” because Excel DOESN’T automatically change this to a date, which makes it easier to data-process later-on), anchor text used in the link, the url of the post and the url on your site that it links to.
Keeping Your Workflow In Order
Every time you find a new potential prospect, you should be adding that site to your main worksheet. Remember first to scan down and check whether you already have that prospect (this is why we keep live/rejected/noresponse prospects in the sheet, so that you don’t accidentally contact the same blog twice).
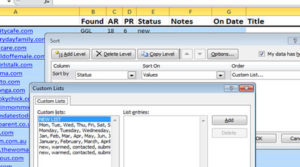
As you add prospects and change statuses, your data can get pretty messy. Fortunately, you can use the sort function to keep it in order. It makes most sense to sort your prospects by status, so that all of your submits, contacts and scheduled links are grouped nicely together.
Sorting alphabetically is one option, but there is a better option. Go into file->options->advanced and look for an option labelled ‘manage custom lists’.
Add a new list, and enter the statues in the following order: new, warmup, contacted, submitted, scheduled, live, noresponse, rejected. Once you have done that, you can simply use the sort function, select custom lists and select your list. This will keep your prospects in a sensible order, and the live and rejected prospects will be at the bottom, out of the way.
Link Building Management
This whole exercise is about managing your link building process, so that you know where you are up to and what links you already have. That’s why we have kept the first worksheet blank until now. This worksheet is going to be our summary page so let’s start by renaming it ‘summary’.
Link Progress
The summary sheet is going to tell us what we have achieved so far. The first few things we want to know are:
- How many blogs have we contacted?
- How many posts have we submitted?
- How many posts are scheduled to go live?
Let’s start with some headers. In cell A2, we’ll put our website ‘yourdomain.com’. In B1, C1 & D1 put ‘contacted’, ‘submitted’ and ‘scheduled’ respectively. In B2 we are going to use the following formula:
=countif(yourdomain.com!E2:E2000,”contacted”)
This formula will count every cell within the range E2-E2000 (2000 cells should be plenty, but increase this number if needed) in your main worksheet that says ‘contacted’. It will simply output a number – the number of prospects you currently have labelled as contacted. Do the same in cells C1 & D1 but using ‘submitted’ and ‘scheduled’ respectively.
You now have a snapshot picture of how many potential links you have in the pipeline. If you have targets to hit, this is a great way to see how much more work you have to do this month (or whatever) and what work you should be doing.
Tracking Your Links
The other brilliant thing that you can do with this spreadsheet is track your links to make sure that you stick to a strategy that compliments your SEO goals.
Below your top summary box (in cell A4 maybe) put another header “URLs”. Under this header, list all of the URLs on your website that you are building links for. In the cell to the right of each URL you will want to put the following formula:
Put this formula in cell B5
=countif(links!D$2:D$2000,A5)
This formula will count how many links recorded in the links worksheet are linking to the URL shown in cell A5. You can copy the formula down for all of the URLs you want to build links to. The $ signs will prevent the range you are checking from changing as you copy downwards.
Under this column, add a formula to total up all of the above cells. This will give you the total number of links you have built so far for all of the pages you are working on. Using this data you can see at a glance any pages that you are neglecting and more importantly, any pages you are being too aggressive with.
Optional: Monthly Link Tracking
What if you want to track how many links you have built in a month? Or see your monthly trends? Well that’s pretty simple too. First you need to add a new column in your ‘links’ worksheet. Let’s give it the header ‘merge’ and we’ll put it in column Z so that it’s out of the way.
In cell Z2 put the formula: =A2&D2.
This will simply give you one ugly-looking cell with the month and URL shoved together. Copy this formula down to Z2000 and then right-click on the top of column Z and click ‘hide’. This will hide the column so that it can just do it’s thing in the background.
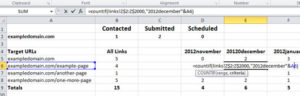
Come back into the summary sheet and add a new header to the right of the URL link summaries. Let’s start in cell D4, so we’re leaving column C, just to make it easier to read. Let’s start from last November, so the heading will be ’2012November’. In the next column put ’2012December’ etc…
In cell D5 put the formula:
=countif(links!Z$2:Z$2000,”2012November”&A5)
This formula is counting how many instances of [statedmonth]+[targetURL] exist in column Z. In this instance it will tell us how many links were added to this target URL in November. Do the same for December, January and every proceeding month and copy the formula down for each target URL.
What you now have is a break-down for each target URL; column B still shows the total links built, columns D on-wards show how many were built each month. With every passing month you can add a new column and you can easily turn this historical data into a nice graph to show your link building progress.
You can also add a total under each column, which will then show the total links built to all pages on that month.
Pay It Forward!
How do you do your link building? If you found this guide helpful, let us know! We love feedback, so leave us a quick comment below. Better yet; why not share this page on Facebook or Twitter? Support our blog by spreading the word!